<previous> Adobe Illustrator Keyboard Shortcuts <next>
Part III: Prepare the .ai File for Editing
Un-Clip the Layers
All of the default clipping and grouping of the data layers is fine, if we were ready to print…. But we’re not. You can make some minor tweaks (like changing the line color for all of the features in a layer) without unclipping and ungrouping the layer, but in order to do much in the way of custom editing or manipulation to the individual features you will need to first un-group the layers so we can work with the individual graphic elements. And in order to un-group the layers we must first remove the Clipping Path (or Mask) layer. In the short run, this will mean we will lose the clipped aspect of the map (the data will bleed out to the edge of the page instead of being nicely contained in the data frame), but we’ll fix that later.
NOTE: There are two ways to delete (remove) Clipping Paths. One is to delete them ALL at once. The other is to select and delete them one at a time. The advantage of removing them All at once is that it's much quicker. The downside is that you may end up removing some Clipping Paths that you actually want to keep. The safer option is to manually remove each clipping path one at a time, verifying as you go that you are only removing what you want to remove. This method also allows you to only delete those clipping paths that you need to delete (i.e., just those that are preventing you from making the edits you need to make. If you have done a lot of your cartography in ArcMap you might not need to remove many (or any) of the Clipping Paths... For ENVS-321 removing them all should be fine - but check to make sure that nothing valuable was lost in the process (making backup copies of the .ai file before and after).
Use Save As to create a new version of your file, Select and Delete All of the Clipping Masks and see if that worked (nothing missing, all layers still there, etc.). If need be you can abandon that version, go back to the earlier version and remove the Clipping Masks one at a time...
To Remove All of the Clipping Masks at Once
-
From the Select menu choose Object and then Clipping Masks (this should select a number of elements on your map)
-
Press the Delete button (on your keyboard) do delete all of the selected Clipping Masks
-
When you do this the major change that should be apparent is that map features should now extend beyond the edges of the map (dataframe) border. Don't worry, we'll fix that later.
-
Review your map layers, text, etc. to be sure that you haven't deleted anything that you actually need... (if you did, go back to your previous .ai file version and use the individual deletion method below)
-
Note that even though this should have deleted All of the Clipping paths, it may not have. If you run into any remaining Clipping Paths in your Layers you can delete them individually using the method outlined below)
To Remove Clipping Masks One at a Time
1. Select a Clipping Path (see graphic below):
- In the Layers Panel expand one of the main layers by clicking the triangle beside the layer name (make sure the layer is visible)
- Likewise expand the <Group> layer(s) within the main layer
- Click on the <Clipping Path> layer within the Group layer (once selected it should be highlighted in a gray-blue)
- Next, click to the right of the circle beside <Clipping Path> to select the Artwork: a small blue box should appear indicating that the Clipping Path is selected. There should also be a smaller blue box beside the name of the Group and main layers above the Clipping Path layer
- Make sure you do NOT click the circle
- Note: To unselect a layer turn it's visibility off and then back on again
2. Delete the Clipping Path:
- With one of the <Clipping Path> layers highlighted and the blue box selected, delete the clipping path by pressing the Backspace button, the Delete button, or by clicking the Trash Can icon at the bottom of the Layers panel
- Be sure you have both the <Clipping Path> layer Selected (the entire line will be highlighted in gray-blue) and the Art Selected (the blue box at the right is shown) before you delete it
- DO NOT delete the any of the <Group> or <Clip Group> layers - just the <Clipping Path> layers
3. Repeat this process of selecting and then deleting the <Clipping Path> for each of the layers in your file that you want to be able to edit:
- Keep opening / expanding Grouped layers to be sure you remove All of the Clipping Paths (there are probably lots of them…)
- Remove the Clipping Path layers for all other layers in your project (except for layers you don't need to modify, such as the locator map, which you might be able to leave alone)
4. SAVE your .ai file (optionally using Save As and creating a new version…)
NOTE: you can use Ctrl + Z (or Undo… from the Edit menu) to undo whatever step you have just done in Illustrator. You can also go back multiple steps. ‘Undo’ works far better in Illustrator than it does in ArcMap, allowing you to undo almost anything you have done)
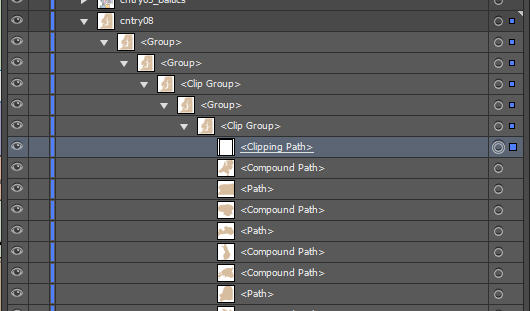
The cnty08 layer before any Un-Clipping has been done…
- The <Clipping Path> layer has been selected (it is highlighted in gray-blue). It has also had the Art Selected (indicated by the blue box to the right of the layer)
- Note that the <Clip Group> above the <Clipping Path> also has a smaller blue box beside it, but the <Clip Path> layer is not selected (highlighted in gray-blue)
- Likewise note that the <Path> layers below the Clipping Path (the actual graphics of the layer) are not selected
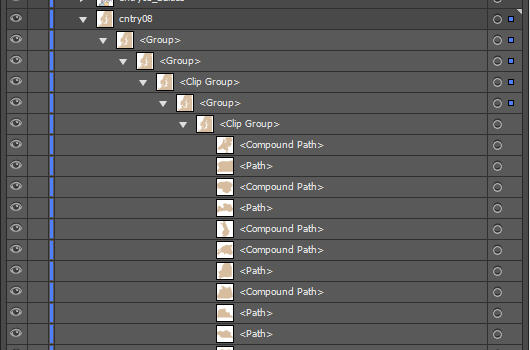
...and After the <Clipping Path> has been deleted (the <Clip Group> and the <Compound Path> layers still in tact, but the <Clipping Path> layer is gone).
Un-Group the Layers
Next we want to Un-group the layers so that we can edit individual features. Grouping is a way to package similar types of artwork. However, like the Clipping Path, it is unnecessary at this point and prevents editing of the data. Also, having the features Grouped as sub-layers is a redundant level of organization at this time. If you continue to work with Adobe Illustrator you will want to familiarize yourself with grouping, but at this point we want to simply un-group each of the sub-layers so we can more easily work with them.
5. Un-Group all your layers:
- As with the Clipping Paths, expand one of your main layers in the layer panel
- Highlight (click) the <Group> or <Clip Group> layer (once selected it will be highlighted in gray-blue)
- Click to the right of the <Group Layer> to Select the layer's Art (blue boxes will display for all pieces of artwork in this group)
- This time, however, instead of deleting this layer, you will need to un-group this layer:
- To un-group click Shift + Ctrl + G (or choose Ungroup from the Object menu)
- You will see the grouping get released, and the <Group> or <Clip Group> layer disappear
6. Do this for all of your grouped layers - except for the any layers you've decided to not edit (like a Locator Map)
- Remember DO NOT Delete the Group, just un-group it (the <Group> or <Clip Group> label will go away but the <Path> or text layers remain)
- If you accidently delete a Group layer you can use Ctrl-Z or Undo to restore the layer
- As with the <Clipping Paths>, expand each of your layers to locate and Un-group all of the Group layers… (there are lots of them)

The cntry08 layer with a <Clip Group> layer highlighted and the Art selected...
Note that the <Clip Group> is highlighted in gray-blue and the blue Art boxes are selected
Note that the Art boxes for the Paths within the layer are also selected
DO NOT delete the <Clip Group>
Use Ctrl-Shit-G to Un-Group the <Clip Group> layer
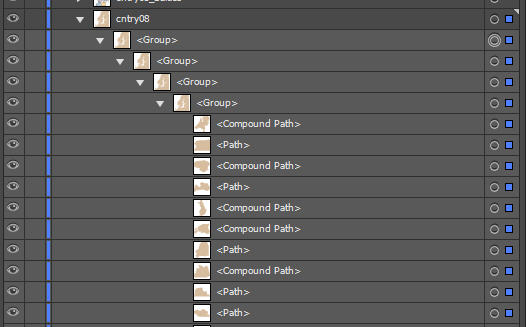
...After the <Clip Group> layer has been Un-Grouped
Note that in the illustrations there are still additional <Group> layers that also need to be ungrouped... We you get done there will be almost No <Group> or <Clip Group> layers left At All.
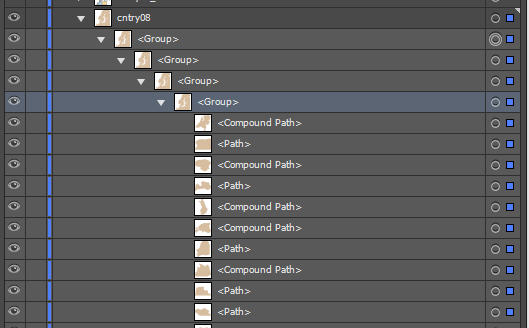
The first <Group> layer selected and ready to un-group...

...and After the first <Group> has been ungrouped (still 3 more to go...)
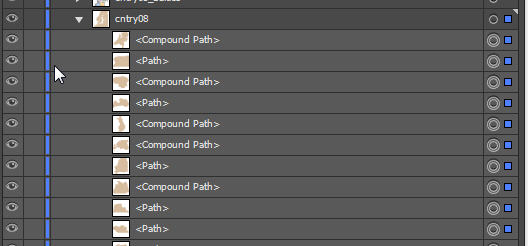
The cntry08 layer after Deleting of all of <Clipping Paths> and Un-Grouping all of the <Group> and <Clip Group> layers.
Note that the individual features (sub-layers) are still all in one sub-layer ("cntry08") but the extra sub-layer grouping is gone
7.SAVE your .ai file (optionally using Save As and creating a new version…)